Environments
Note
This feature is in beta testing.
Administrators can monitor the packages installed in user environments, view any Common Vulnerabilities and Exposures (CVEs) associated with them and, if necessary, enforce security standards by blocking the environment from use. IT administrators can also provide a custom message to guide users through environment remediation. This telemetric data assists your IT administrators with auditing tasks by ensuring users are compliant with your security requirements and providing historical tracking for infrastructure audits.
Members can use these tools to ensure their local environments are in compliance with organizational security requirements and avoid machine quarantines or losing access to an environment due to administrator intervention.
In order to utilize the Environments feature, organization members (including administrators) must first complete the required setup steps to enable environment management. For more information and instructions for enabling environment management, see the Quickstart guide.
Logging environments#
With anaconda-env-log installed, all newly created environments are automatically logged within conda, and existing environments are automatically logged whenever you perform certain conda actions (install, remove, rename, or update) in them. Existing environments can also be logged manually by running the following command:
Caution
You must log in to Anaconda Cloud using the CLI prior to manually logging an environment.
# Replace <ENV_NAME> with the  name of the environment you want to log to your organization
conda env-log log --name <ENV_NAME>
Viewing logged environments#
Environments logged with an organization can be viewed at any time from the Environments page. Members can view the environments they’ve logged, while administrators have access to view every environment logged with the organization.
Navigate to your Organizations page.
Select your organization.
Select Environments from the left-hand navigation.
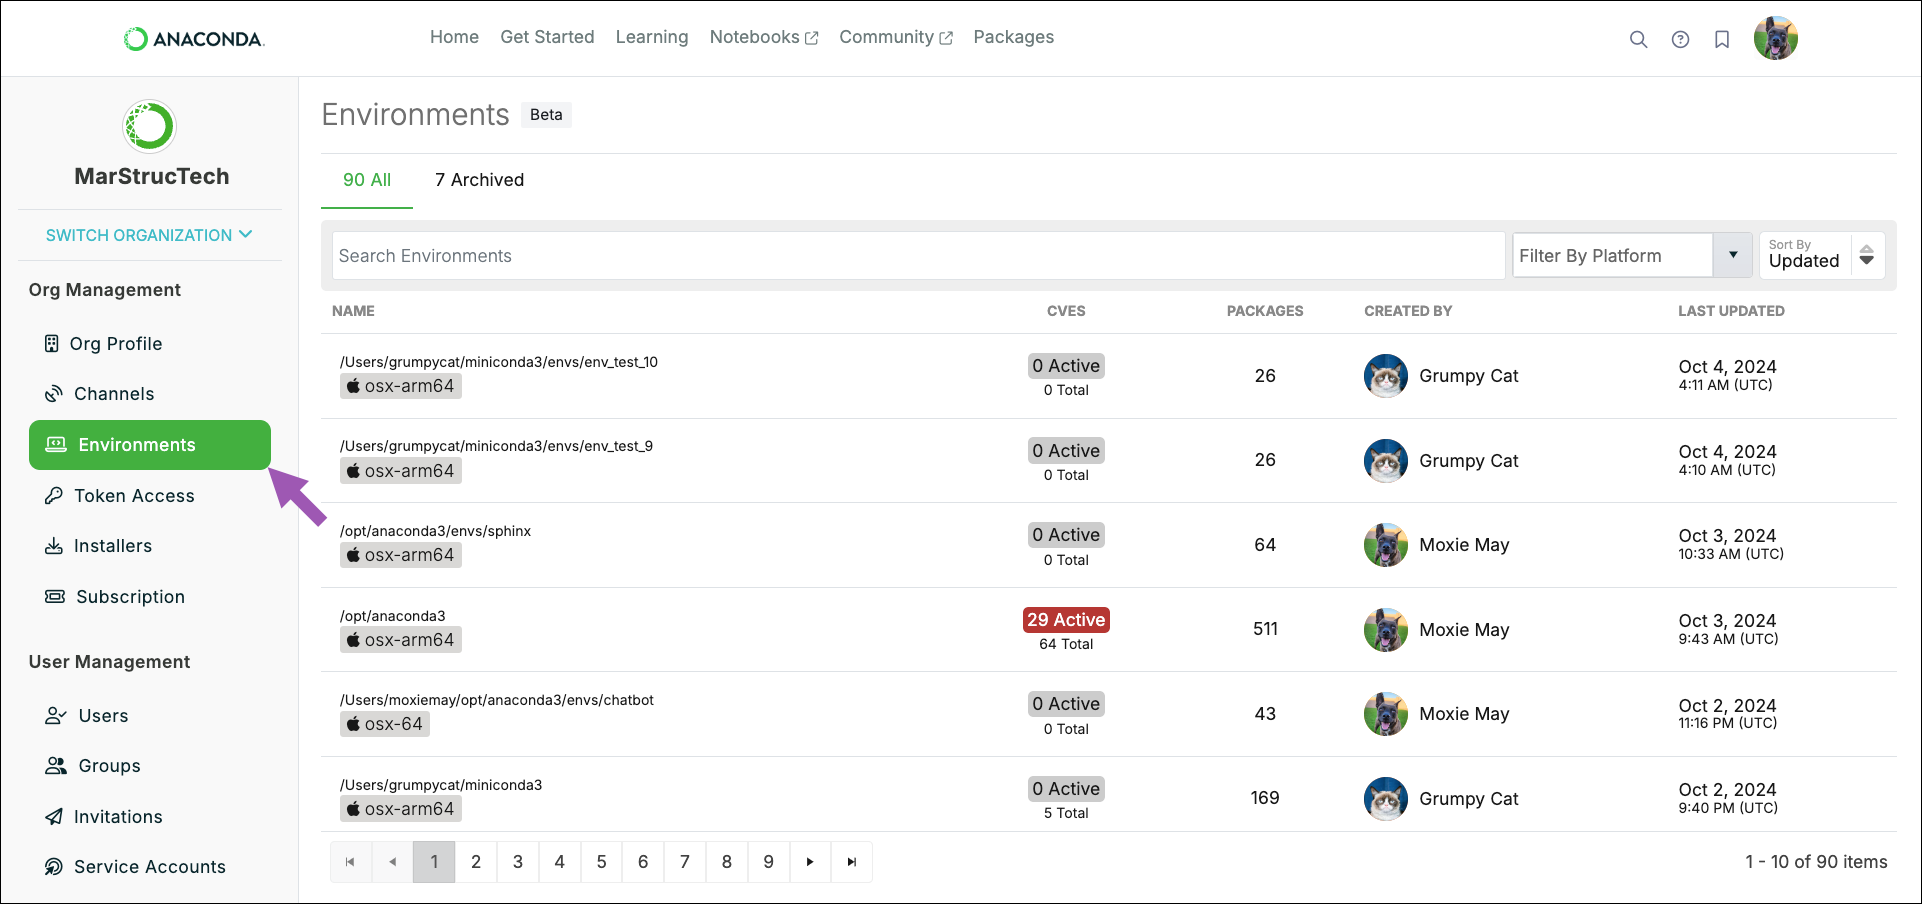
- The Environments page shows you:
Environment names and locations
The number of packages in the environments
The number of CVEs associated with the packages in the environments
The environment’s creator
The last time the environments were updated
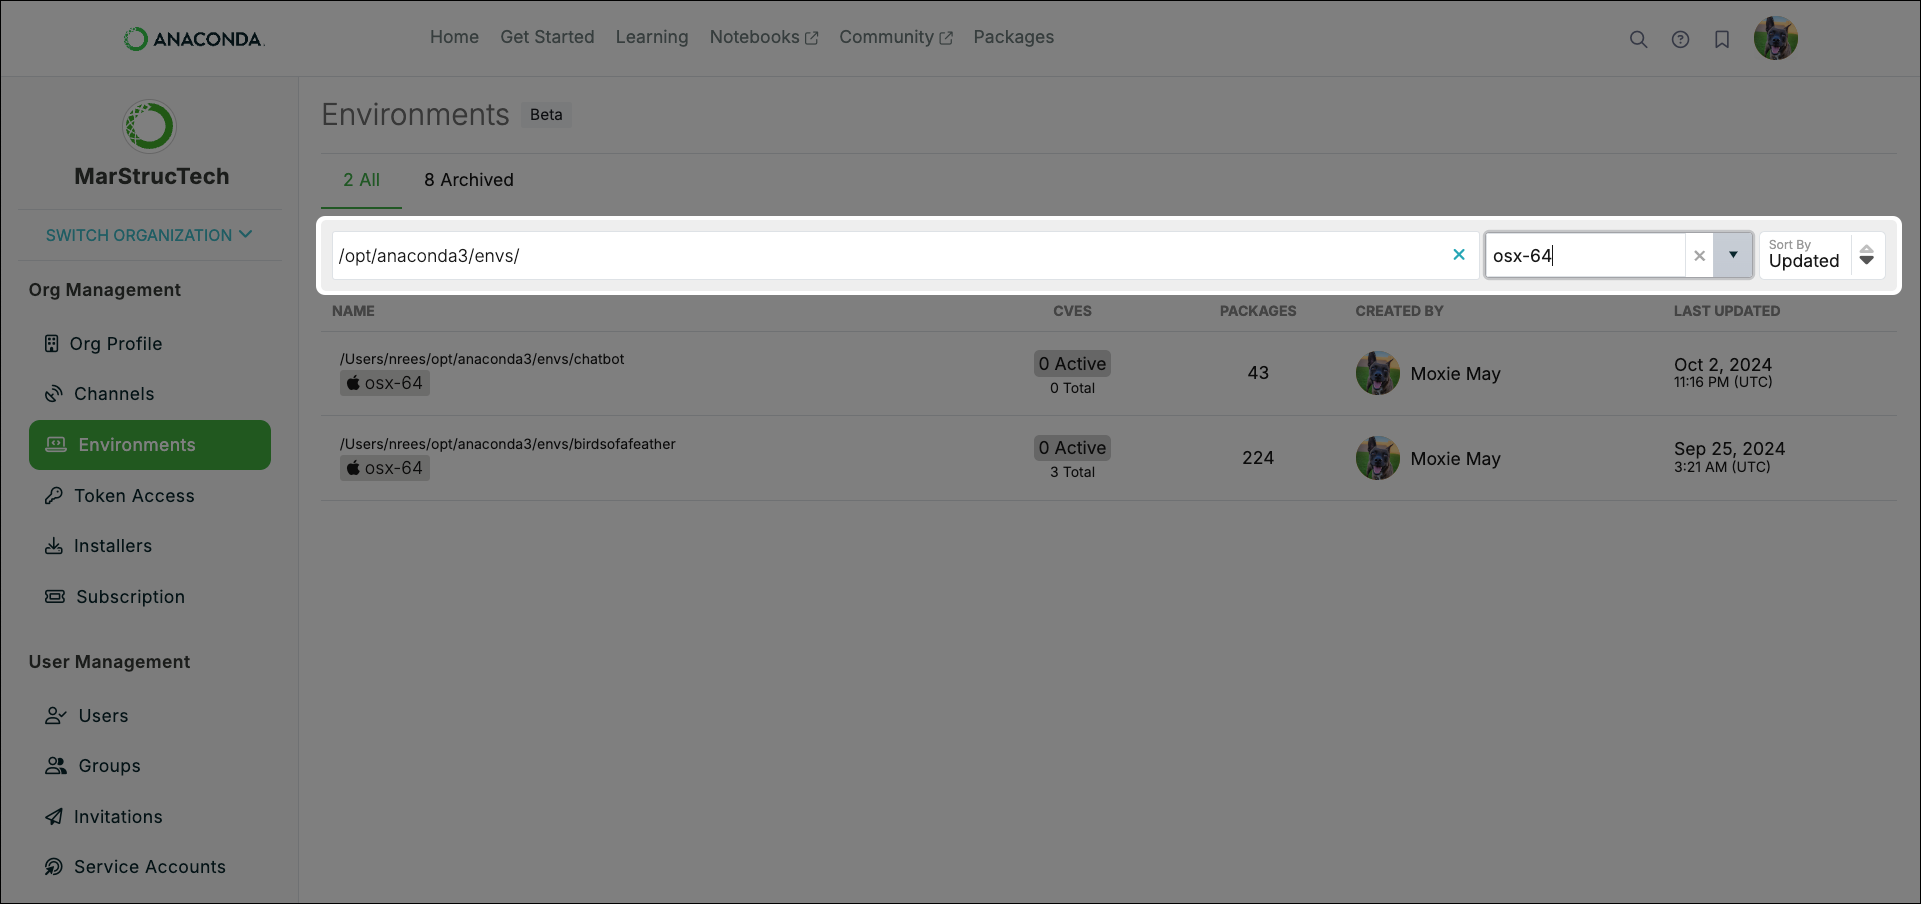
Tip
Use the filters at the top of the table to locate environments efficiently.
Exploring logged environments#
Environments that are logged with an organization can be browsed to gain insights into the packages that they contain. You can see which packages are present in the environment as well as any CVEs associated with them.
Viewing environment packages#
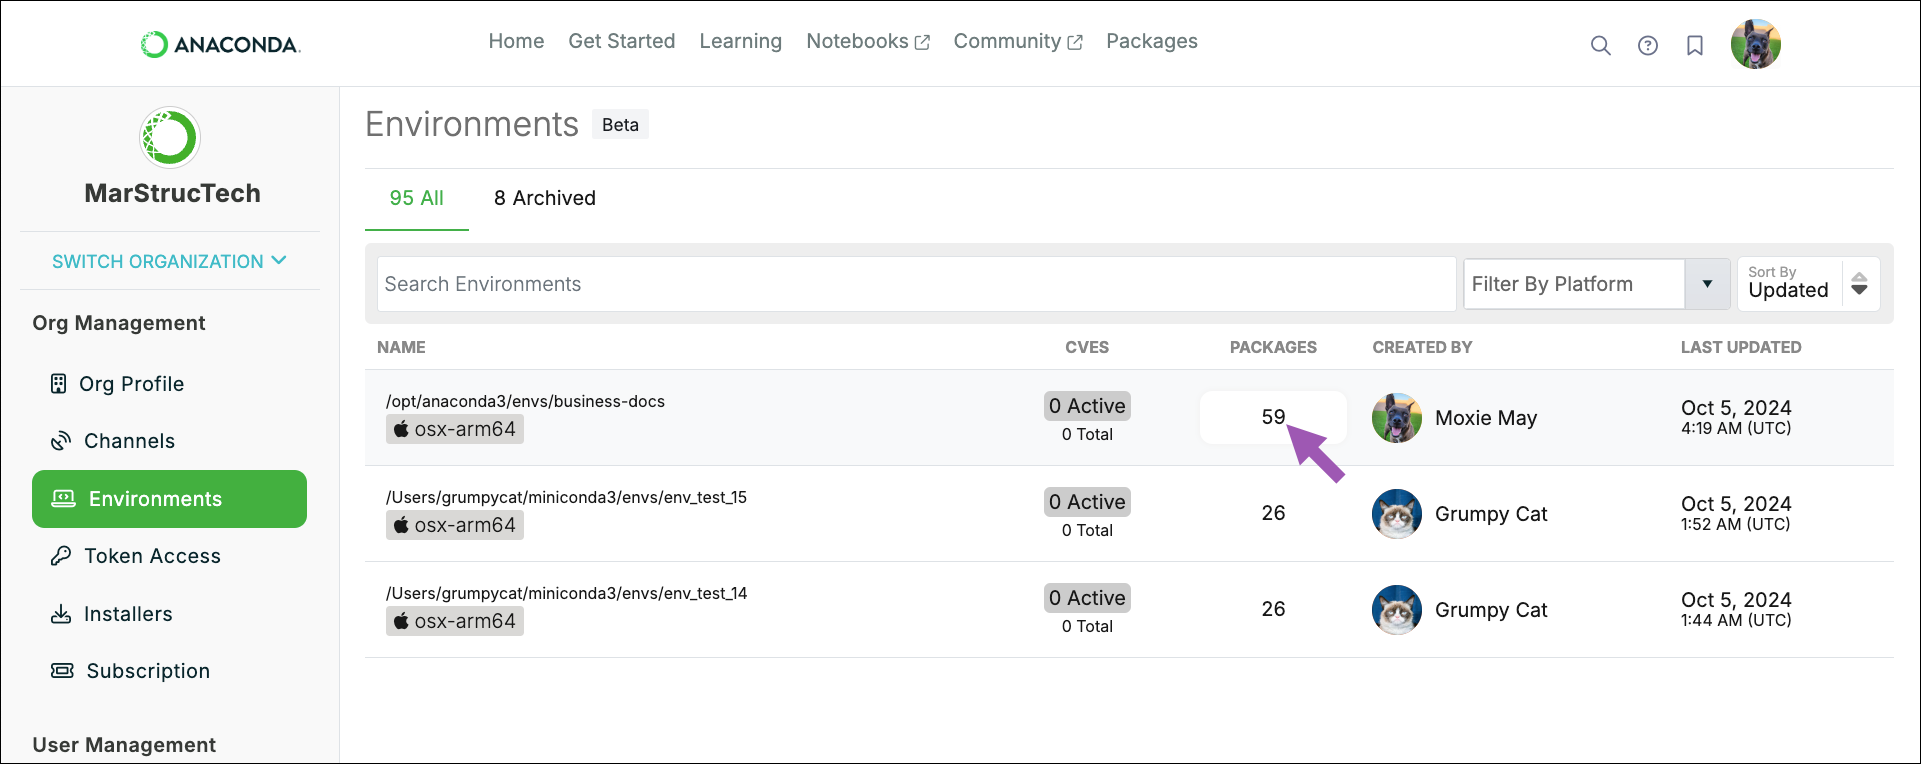
The environment’s Packages page shows you which packages are in an environment and what channels they were sourced from.
Navigate to your Organizations page.
Select your organization.
Select Environments from the left-hand navigation.
Select the package count displayed under the PACKAGES column.
Note
Use the navigation controls at the bottom to browse the environment’s packages.
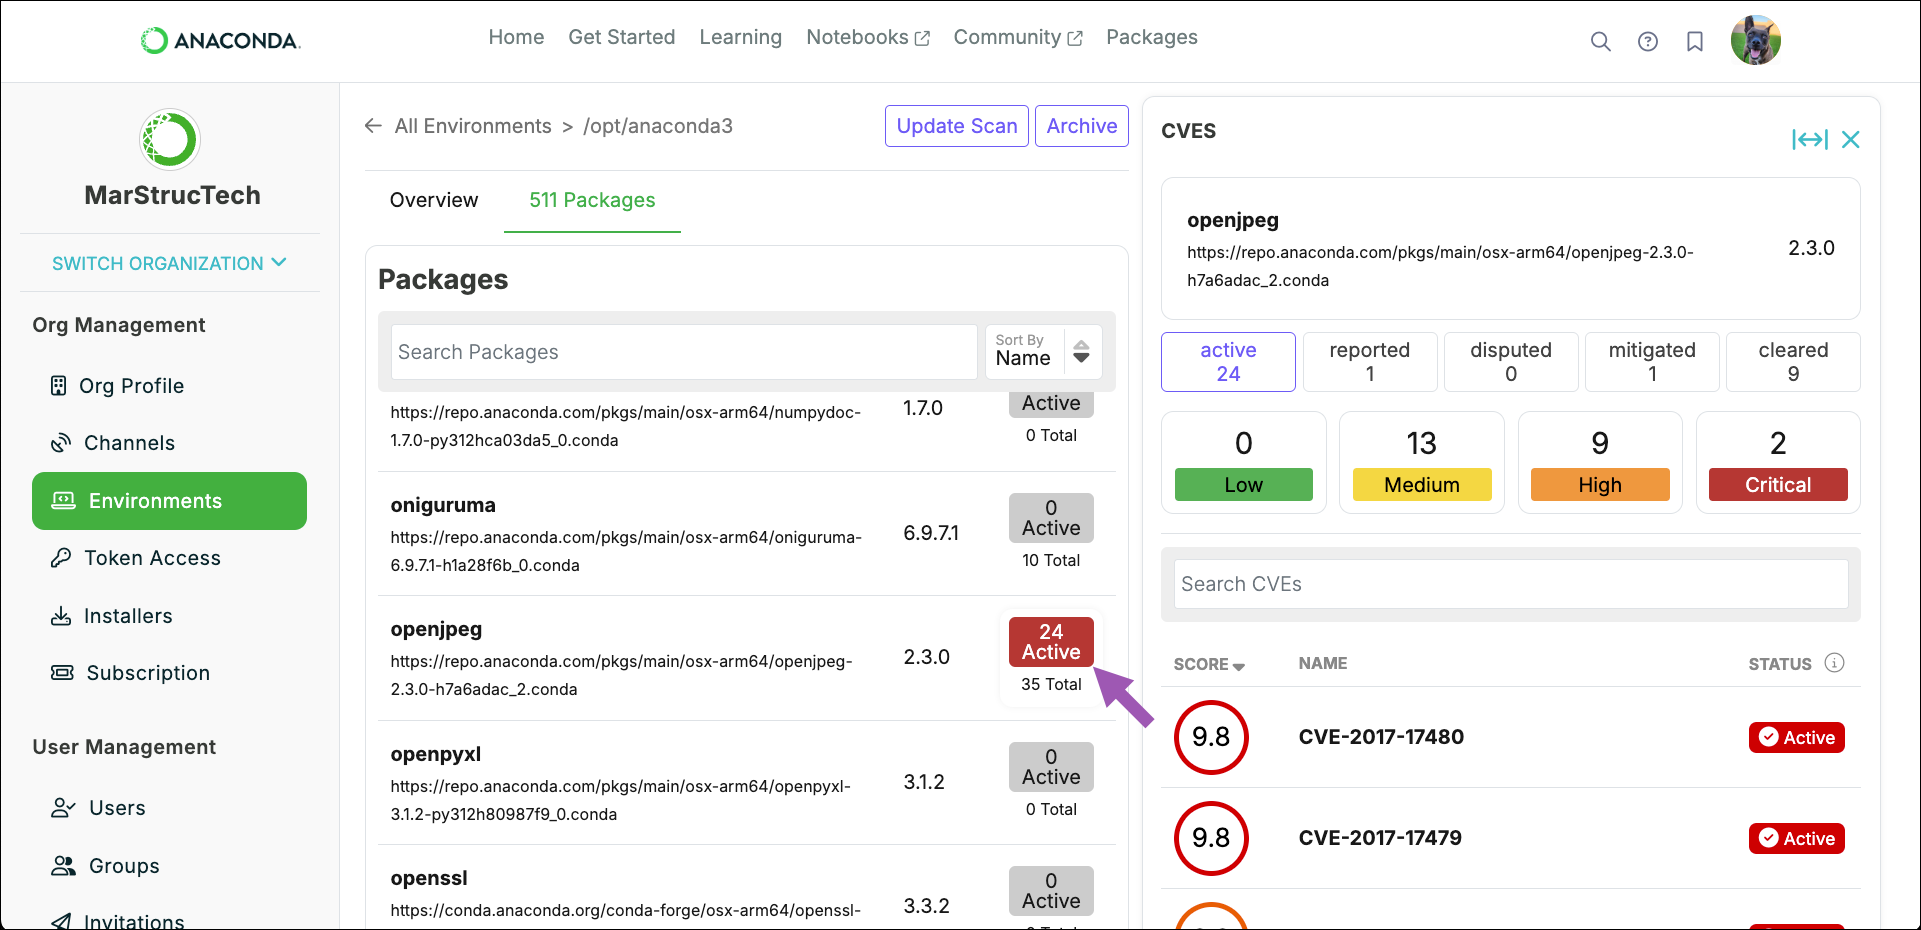
Viewing CVEs#
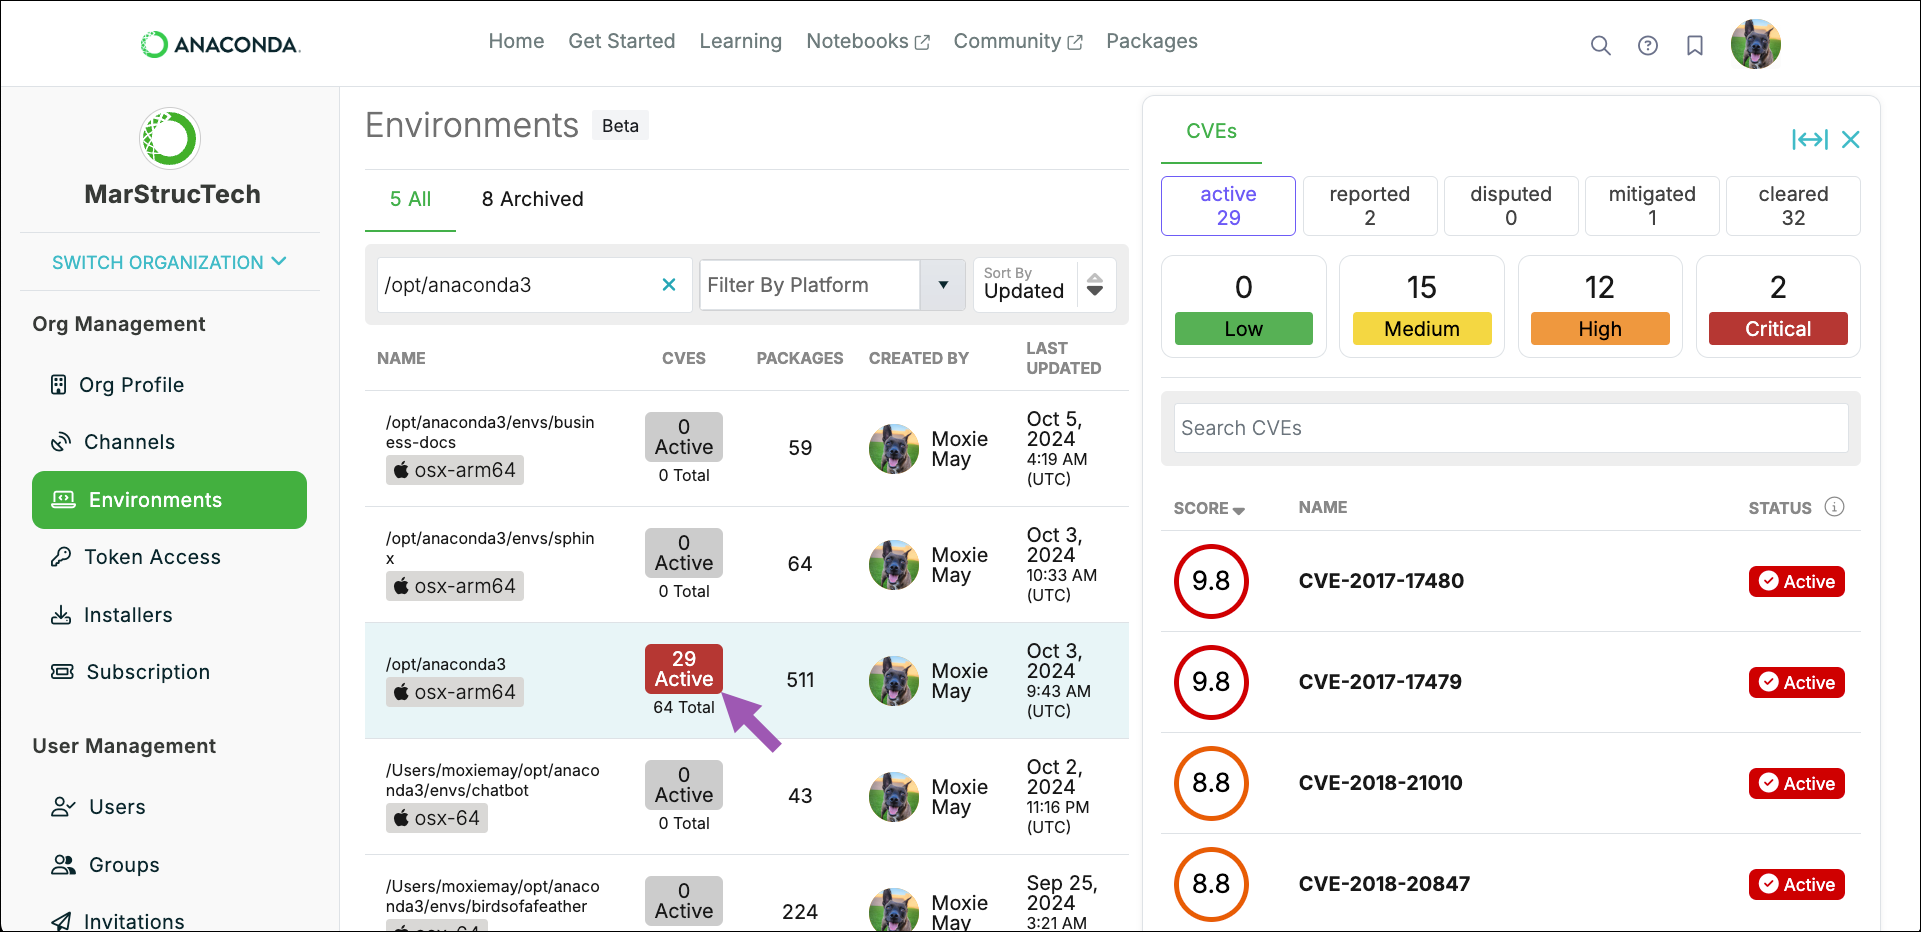
The CVEs panel shows all of the CVEs associated with the environment by name and severity.
Navigate to your Organizations page.
Select your organization.
Select Environments from the left-hand navigation.
Select the CVE count displayed under the CVES column.
Use the filters at the top of the panel to locate critical CVEs efficiently.
Narrow your view to CVEs associated with a specific package in an environment:
Navigate to your Organizations page.
Select your organization.
Select Environments from the left-hand navigation.
Select the package count displayed under the PACKAGES column.
Locate the package.
Click the CVE count displayed under the CVE column beside the package.
Note
The active filter is automatically applied to the CVE panel’s displayed results.
For additional information about a CVE, search for it in a channel that has no policy applied.
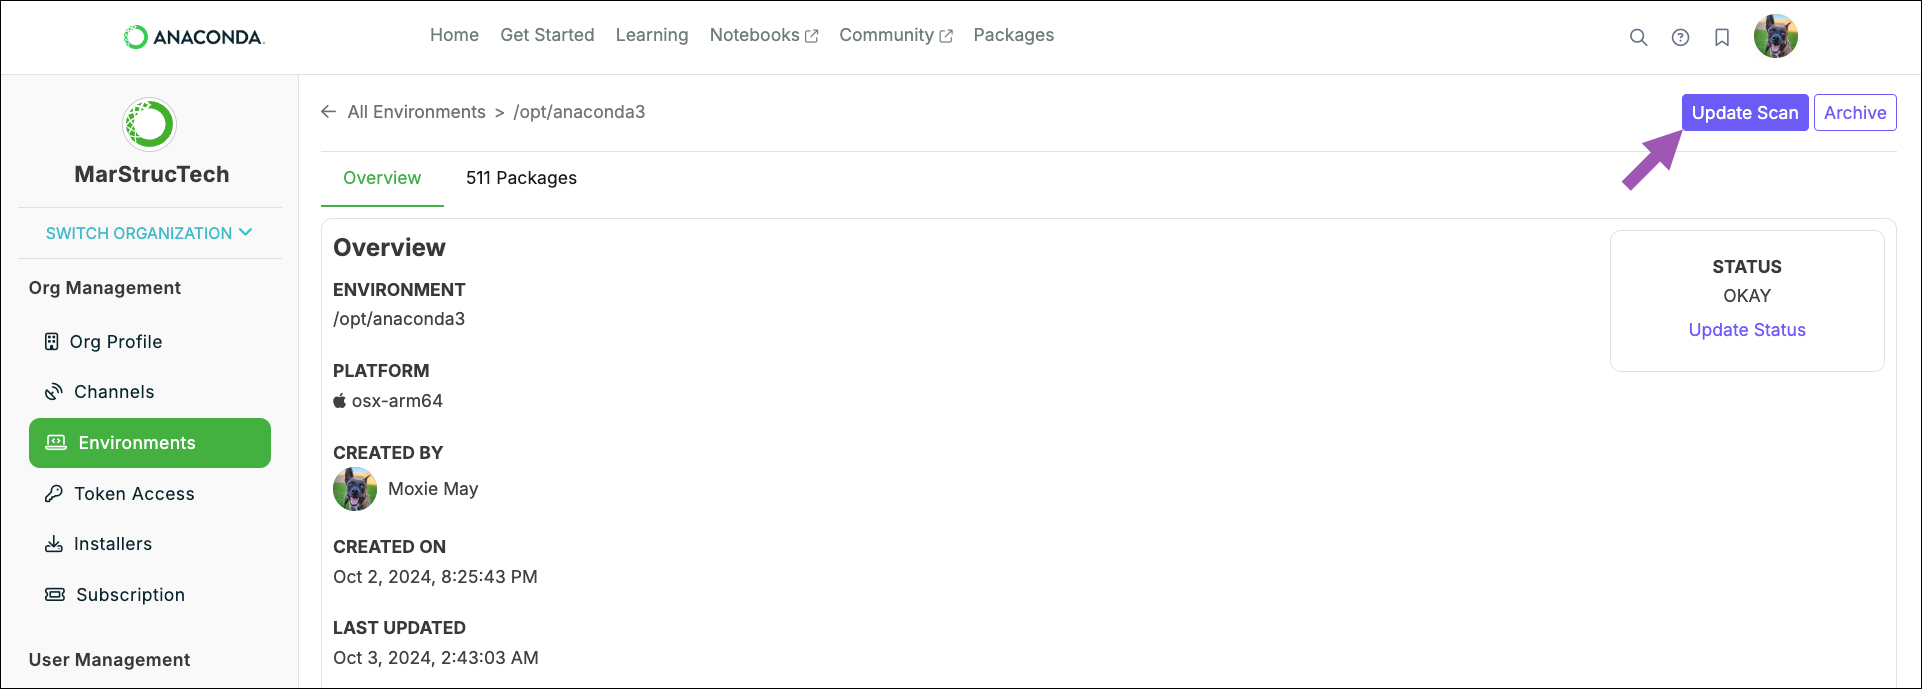
Scanning environments#
Scanning an environment checks the most recently saved conda environment log for CVEs associated with the packages it contains.
Note
Environments are automatically scanned when created, but not when they are logged or when the log updates. To ensure an accurate assessment of an environment’s current CVE state, perform a scan before you explore it in Anaconda Cloud. You can also scan environments locally to identify potential issues immediately.
To scan an environment that has been logged with an organization:
Navigate to your Organizations page.
Select your organization.
Select Environments from the left-hand navigation.
Select the environment you want to scan from the list.
Click Update Scan.
Note
There is no visual notification that the scan has performed. After scanning, review the packages in the environment for newly associated CVEs.
Use anaconda-audit to scan a local environment.
Open Anaconda Prompt (Terminal on macOS/Linux).
Scan an environment by running the following command:
# Replace <ENV_NAME> with the name of the environment you want to scan
anaconda audit scan --name <ENV_NAME>
Blocking environments#
Administrators can take action on environments that don’t meet security standards by utilizing organizational environment security status controls, which allow them to place a warning on an environment or block access to it completely. In both cases, administrators can enter a personalized message with guidance on what actions must be taken to restore access. Organization members who have had their environment blocked will receive the administrator’s message next time they try to activate the environment.
Navigate to your Organizations page.
Select your organization.
Select Environments from the left-hand navigation.
Select the environment you want to take action on.
Click Update Status.
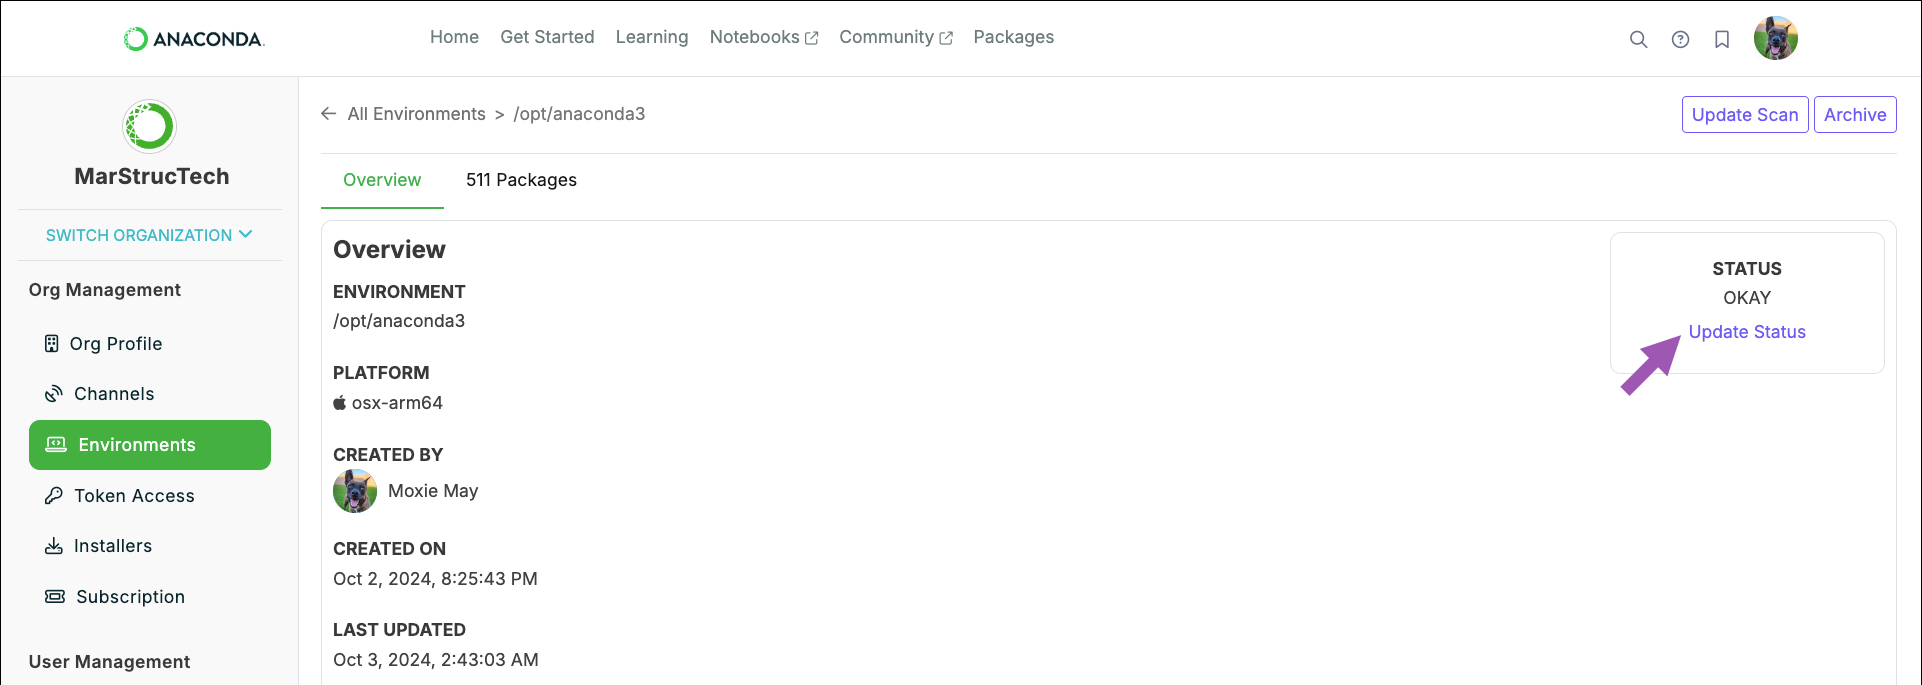
Select a status to apply to the environment and enter a custom message, if necessary.
Click Save.
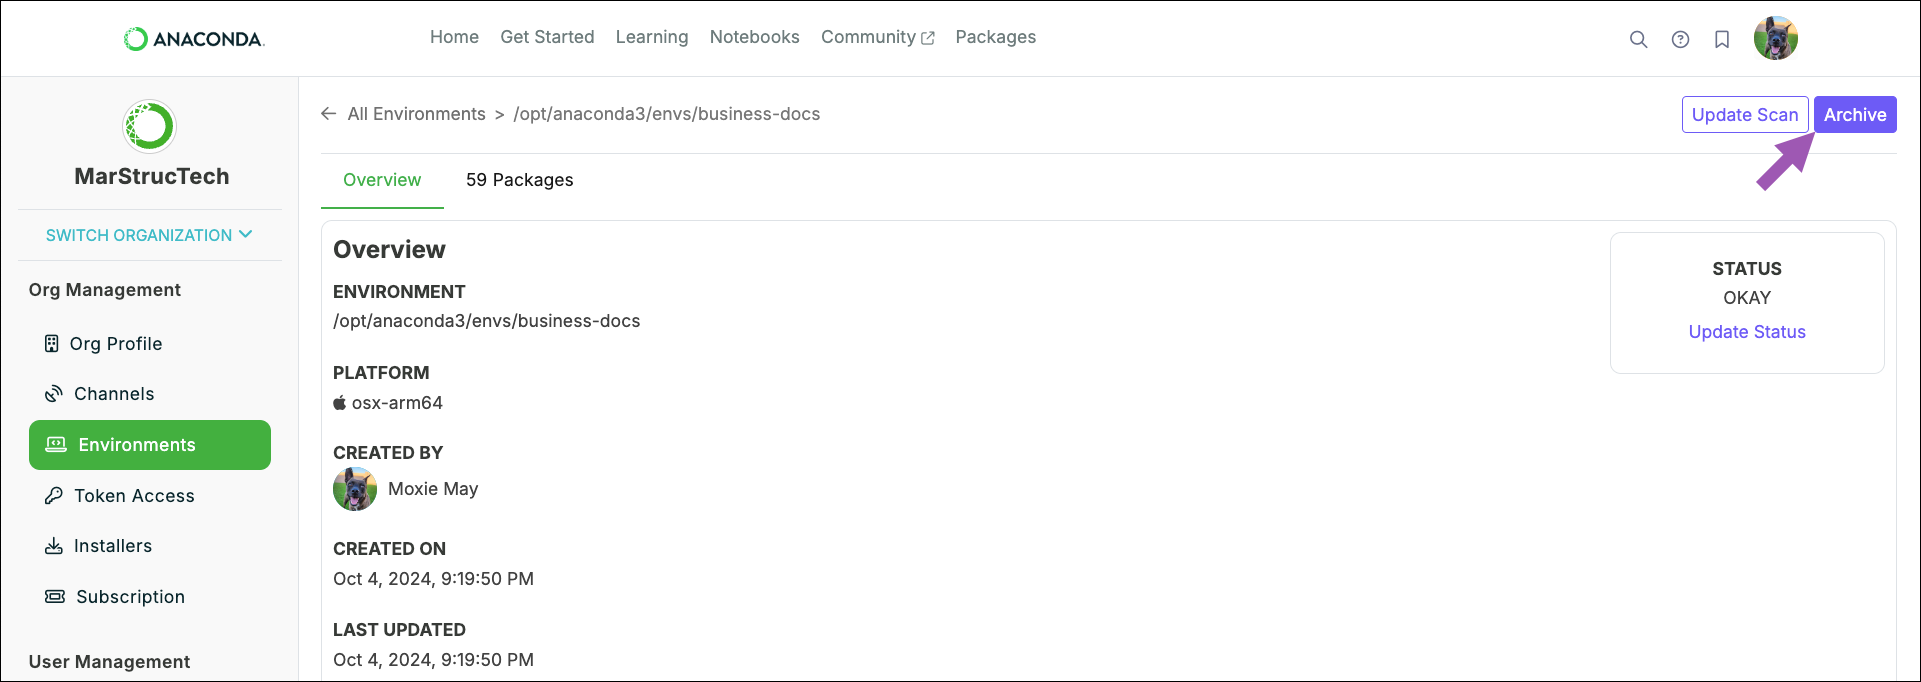
Archiving environments#
Archiving environments allows administrators to maintain an organized workspace by moving inactive or obsolete environments to a dedicated tab. This separation reduces clutter in the active environment list, making it easier to manage.
Navigate to your Organizations page.
Select your organization.
Select Environments from the left-hand navigation.
Select the environment you want to take action on.
Click Archive.
Note
Archived environments are still available for use. If you would like to prevent the environment from being used, block the environment.